


Well Hello!!! If you’ve read my one year anniversary post (Happy Anniversary?!) I did mention that I’ll share twelve (12) posts in twelve consecutive days. After saying that, I said to myself “REALLY?? DID I just SAY THAT??” I was actually scared that I might not be able to commit to that promise but HEY! Here I am now on my twelfth day and my twelfth post! Hurray to me.. pheww…And Thank’s to All of You as you’ve encouraged me to continue sharing, in fact you made my blogging moment so much fun. 🙂
Now, onto my twelfth post. I am so excited to share my Polish of the Week ft. a new tool that I’ve always wanted to try.
 If you’ve seen yesterday’s post (Red My Lips!
 ) I talked about my go-to Red Lipsticks. So in continuation of that, I thought I’d paint my nails red in conjunction of this upcoming Valentine’s Day. I Love Red Nails.. A Lot.. As well as Red Lips too. I felt like you can never go wrong in wearing red.


Ok, enough talk.. and let’s proceed..
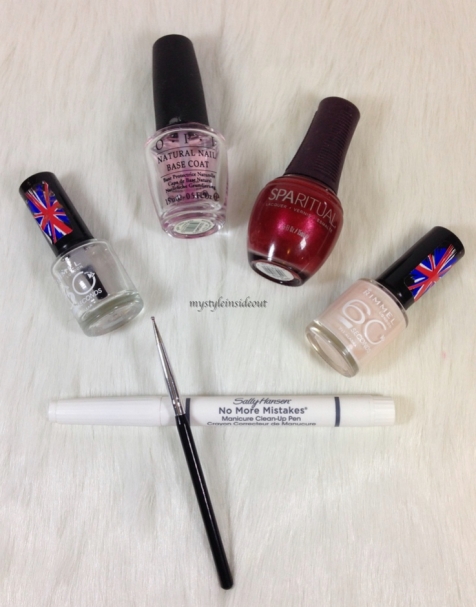
First, I make sure that I have my Base Coat (OPI) and Clear Coat (Rimmel London) ready. I NEED to apply a BASE COAT before anything else. I cannot elaborate enough as to why I need a Base Coat on my nails. If you want to know why.. Check this out Polish of the Week!.

Next, I applied the Sparitual Nail Lacquer in STILETTO and while it’s still wet I then applied Rimmel London 60 Seconds Nail Polish in ALASKA on top.


Now, for the fun part! I actually bought this Salon Secrets Nail Art Tool Kit just recently as I’ve been eyeing this since forever.


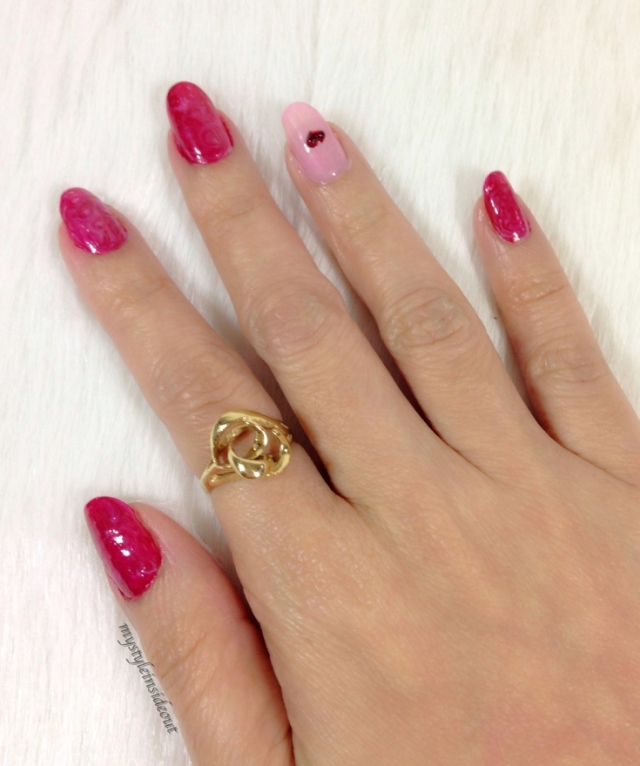
So while the polishes are still wet on my nails, I used the Dotting Tool and swirl the nail polish on my nails to create an abstract design mixing the STILETTO and ALASKA together (I still need more practice on this technique though, but we’ll get there).


Let it sit for about five seconds and apply the Top/Clear Coat. These nail polishes are quick dry so no need to let it sit for a few minutes.
While on my ring fingernail, I just mixed both STILETTO and ALASKA together to create this almost pinkish look and add this HEART shaped acrylic rhinestone on top while the nail polish is still wet. Then I applied the Top/Clear Coat to seal the rhinestones. I didn’t have to use any glue on them as the Top Coat is good enough to keep them in place.


Lastly, to clean up the mess.. I used my all time favorite Sally Hansen No More Mistakes Manicure Clean-Up Pen and I purchased mine at Walmart. Mind you guys, I’ve had this Manicure Clean-Up Pen for a year now and it’s still doing a great job. It comes with two extra replacement tips so you will be able to replace them anytime and not buy a whole new pen.

and Voila! my nails are ready for a date night! ❤

What do you guys think??
AND WAIT! Don’t forget to ENTER my FUN GIVEAWAY! it’s ending very very soon (Winner will be announced on February 14th). 👍🙋

-12-

I love this!!! So pretty and fancy! I def need to get me one of those clean up pens!!
LikeLiked by 1 person
Thanks! And yes.. You must try it.. They are awesome!
LikeLike
How fun! And subtle too. I would mess it up so badly, I’m not even kidding you! 😛
LikeLiked by 1 person
Haha! I’ve been doing my nails since oh Gosh!! As far as I can remember.. I just don’t have the tools to really experiment on other techniques (too lazy -in other words) And Im actually good in using my left hand than my right.. I always messed up with my right hand.. Weird isn’t it? Haha
LikeLiked by 1 person
These are so pretty! I have a bunch of nail art tools and I hardly ever use them – I really should!
LikeLiked by 1 person
Oh you have to start using them.. practice makes perfect you know… hahaha and Thanks for dropping by! 🙂
LikeLike
I love this!!
LikeLiked by 1 person
Thank you.. Im so glad you love it!☺️☺️ I can’t wait to play with my new tools again.. 😊😊
LikeLiked by 1 person
Can’t wait to see different things you come up with!
LikeLiked by 1 person
Yay! Thanks and yes I’m excited.. hhehe
LikeLiked by 1 person